How to Homogenize the Nuclear Waste Repository Data
The following describes how to use the JHomogenizer tool to homogenize maps
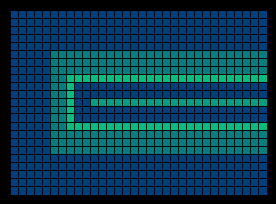
comprised of porous media data from an idealized nuclear waste repository
configurations as seen below. There are distinct coefficient values in the
different regions that differ by several orders of magnitude.

|
|
|
Map 1 Configuration
|
Map 2 Configuration
|
The following describes how to compute homogenized values from the original map
and use these to create maps that include more than one copy of the map to
represent several of these sites in the same region.
The Steps:
In this example the steps for creating a coarser grid from an original
heterogeneous map defined on a finer grid. In addition, an example of how to
create an html file containing the output is presented.
- If the JHomogenizer interface is not running, start up the interface.
- The map can be loaded into the JHomogenizer interface or clicking on the
Load Map or the Import Map buttons. Then load in the map
from the map1.map or map2.map file. These files come along with the
JHomogenizer tool and can be found in the data set. The data set can also
be downloaded the link above.
- The next step is to set the homogenized grid size. The values in the
Homog Input text fields. The values in the x and y coordinate boxes
should be changed to 1. The heterogeneous input boxes should show 8, 32,
and 1 or Map 1 or 32, 23, and 1 for Map 2. Thus the homogenization
will produce a single tensor.
- The next step is to choose a homogenization methods in the list and click
in the item. The item should be highlighted.
- Finally, click on the Homogenize! button. The interface will start
the calculations and the status will be shown in the Status: line
near the bottom of the interface. You will be prompted for a map name for
the result of the homogenization process. Enter the name in the dialog
and type a carriage return or click on the Okay button.
- You can display the values by clicking on the map in the map list and
then you click on Display Values button. The values will be
displayed in the text window. The values from the HomCode choice should
be the those shown on the Nuclear Waste Site
Data web page.
- Once this is done, other methods can be applied to the initial map by
clicking on the map in the map list. In our example, click on invertedL.
Then click on another homogenization method choice and finally click on
the Homogenize! button. To display the new values, click on the
Display Values button.
We can also create an output image of the map using the MapEditor tool.
To do this do the following.
- Start up the MapEditor tool.
- Once the map is loaded into the display area, click on the Create PPM
File. The interface will write a ppm file that contains an image of
the map. The name of the file is map.ppm.
- The ppm file can easily be translated into other graphics formats using
xview or other image editing software.
Finally, you can save the map data and all of the homogenized results by
clicking on the Save Maps button. The data will be stored in a folder
with the same name as the name of the file. All of the homogenized results will
be stored in subfolders of the original folder.
To reload the data you can use the instructions in some of the other examples.
These instructions will not be repeated here.
Creating Multiple Cell Maps:
A facility in the JHomogenizer tool allows the user to merge maps together to
create new maps. In the present situation we want to create a map that has
multiple copies of the single maps above. This can be done as follows.
- If the JHomogenizer interface is not running, start up the interface.
- The map can be loaded into the JHomogenizer interface or clicking on the
Load Map or the Import Map buttons. Then load in the map
from the map1.map or map2.map file. These files come along with the
JHomogenizer tool and can be found as described above.
- Click on the Connect Maps button. A dialog box will appear that
can be used to merge map data. The name of the maps available in the
JHomogenizer tool will appear in the lists in the dialog.
- Choose the first map to use in the connection by clicking on the name of
the map. Next click on the Set Map button. The map name will
appear in the first text area next to the Set Map button.
- Next choose the map to connect. For our purposes we want another copy of
the file. Since the appropriate map is already highlighted, clicking on
the Set Map button will set the second map. The second text field
will show the map name.
- Click on the direction in which the connection will be performed. In this
example, click on the Y-Connect button. This will stack the
copies in the vertical direction. If you do not specify the direction of
the connection the maps will not be merged.
- To connect the maps, click on the Connect button. The application
will connect the maps unless the dimensions do not match.
- To complete the process, click on the Okay button. You will be
prompted for the name of the new map resulting from the connection.
Note that you can connect more maps during the process. Before clicking on the
Okay button you can choose more maps to connect to the result above. For
example, if you want to stack three copies of the maps vertically, you can click
on the Connect button. Another copy will be stacked in the y coordinate
direction.
Maps can be imported to provide the pieces in the connection. The Import
button to pull in the data from a map file not currently available in the
JHomogenizer tool. The only rule is that the dimensions match up in the
coordinate direction in which the connection is desired.